
0
Owner's of the Canon Camcorder XF300 gave it a score of 0 out of 5. Here's how the scores stacked up:

Customization
110
4
Custom Picture Settings
Editing a Custom Picture File’s Settings
1 After selecting a file, select [I X Edit File] and then press SET.
2 Select a setting and then press SET.
3 Change the setting to the desired level.
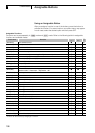
• Refer to the table Available Custom Picture Settings (0 113) for
details on the various settings.
• Repeat steps 2 and 3 for other settings, as necessary.
• To return the file to its default settings, select [Reset], select [OK] and
then press SET.
4 Press the CUSTOM PICT. button to exit the custom picture
menu.
NOTES
• To return the current file's settings to the default values, select
[I Reset] and then press SET. Next, select [OK] and then press SET.
Renaming Custom Picture Files
1 After selecting a file, open the [Rename] submenu.
[I X Edit File] [Rename]
• A screen appears that displays the current file name with an orange
selection frame on the first character.
2 Select an alphanumeric character or symbol then move (A) to
the next field.
• Change the rest of the name in the same way.
3 Select [Set] and then press SET.
4 Press the CUSTOM PICT. button to exit the custom picture menu.
Preset Custom Picture Files
By default, the custom picture files in the camcorder in file slots [C7] to
[C9] are protected. Remove the protection (0 111) to edit the file. The
following describes when to use the preset files.
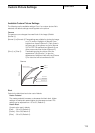
[C7 VIDEO.C]: For playing back video on consumer flat-panel
displays.
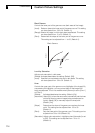
[C8 CINE.V]: For achieving a film-like effect on TV monitors, such as
when creating TV programs that require a film-like
effect.
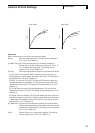
[C9 CINE.F]: For video that will be transferred to film.
[I X Edit File]
[Rename]


Find Your Products By Category
Please Login
