

0
Owner's of the Kramer Electronics TV Cables Kramer Electronics TV Cables gave it a score of 0 out of 5. Here's how the scores stacked up:


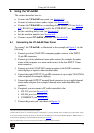


Using the VP-4x8AK
11
11
6 Using the VP-4x8AK
This section describes how to:
• Connect the VP-4x8AK rear panel (see Section
6.1)
• Connect a balanced stereo audio output (see Section
6.2)
• Connect the VP-4x8AK to a controlling device via RS-232 (see Section
6.3), RS-485 (see Section 6.4) and/or the ETHERNET (see Section 6.5)
• Set the switching delay time (see Section
6.7)
• Set the machine number (see Section
6.8)
• Connect several VP-4x8AK machines (see Section
6.9)
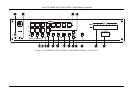
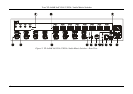
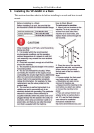
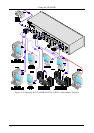
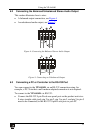
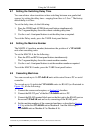
6.1 Connecting the VP-4x8AK Rear Panel
To connect
1
Figure 3 the VP-4x8AK, as illustrated in the example in , do the
following
2
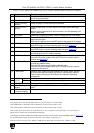
1. Connect up to four VGA/UXGA computer graphics sources to the INPUT
15-pin HD connectors.
:
2. Connect up to four unbalanced stereo audio sources (for example, the audio
source of the computer, or a stereo audio source) to the four INPUT 3.5mm
mini connectors.
3. Connect up to four VGA/UXGA output acceptors to the LOOP connectors
(local displays or inputs to other cascaded units).
4. Connect the eight OUTPUT 15-pin HD connectors to up to eight VGA/UXGA
video acceptors (for example, displays).
5. Connect the eight OUTPUT terminal block connectors to up to eight balanced
stereo audio acceptors (for example, balanced stereo audio amplifiers with
speakers).
6. If required, you can connect a PC and/or controller to the:
RS-232 port (see Section
6.3)
RS-485 port (see Section
6.4)
ETHERNET (see Section
6.5)
7. Connect the power cord
3
Figure 3 (not shown in ).
1 You do not need to connect all inputs and outputs
2 Switch OFF the power on each device before connecting it to your VP-4x8AK. After connecting your VP-4x8AK, switch
on its power and then switch on the power on each device. DO NOT push in the rear panel Flash Program “PROG” button , it
is only used for upgrading to the latest Kramer firmware (see Section
8)
3 We recommend that you use only the power cord that is supplied with this machine


Find Your Products By Category
Please Login
