
0
Owner's of the CHIEF TV Mount CHIEF TV Mount gave it a score of 0 out of 5. Here's how the scores stacked up:
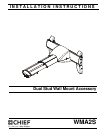


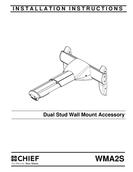
WMA2S Installation Instructions
8
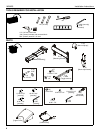
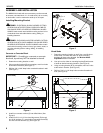
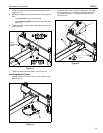
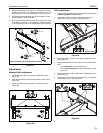
10. Place wall bracket over anchors and align mounting holes
in mounting bracket with holes in anchors. (See Figure 9)
11. Insert 1/4-20 x 1-3/4" Phillips pan head screws (H) through
1/4" washer (G), corresponding mounting hole on mounting
bracket (B) and into anchor (J) and tighten until flush
against mount. DO NOT overtighten! (See Figure 9)
12. Repeat steps 11 through 12 for remaining 3 mounting holes.
WARNING: IMPROPER INSTALLATION CAN LEAD TO
EQUIPMENT FALLING CAUSING SERIOUS PERSONAL
INJURY OR DAMAGE TO EQUIPMENT! Overtightening of
mounting hardware can damage the steel studs. DO NOT
overtighten mounting hardware!
Figure 9
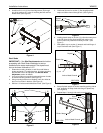
Installation to Mounting Bracket
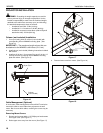
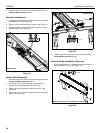
1. Lift WMA2S assembly (A) up to mounting bracket (B) and
hook top plate onto cross bracket on mounting bracket.
(See Figure 10)
Figure 10
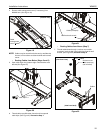
2. Slide lower plate onto cross bracket on mounting bracket.
(See Figure 11)
Figure 11
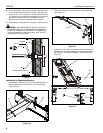
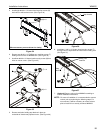
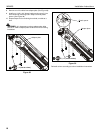
3. Install two 1/4-20 x 5/8" hex head bolts (P) through holes on
WMA2S arm (A) and into sliding nuts on mounting bracket
(B). DO NOT TIGHTEN SCREWS AT THIS POINT! (See
Figure 12)
Figure 12
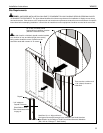
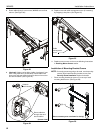
Drywall
Anchor Metal Channel
(B)
SIDE VIEW
(H) x 4
11
Steel Stud
(G) x 4
1
(A)
(B)
2
(A)
(B)
(A)
(B)
3
(P) x 2
7


Find Your Products By Category
Please Login
