
0
Owner's of the Sharp Car Video System PN-L803C LCD MONITOR gave it a score of 0 out of 5. Here's how the scores stacked up:

20
E
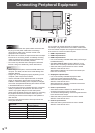
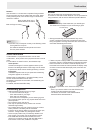
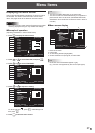
Touch pen actions
Only use touch pens that are used with this monitor (supplied
touch pens or optional PN-ZL03).
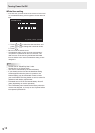
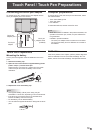
CAPACITIVE
Function button 2
Function button 3
Pen tip
Battery indicator
Function button 1
The factory default settings for the function buttons are as
follows.
• Functionbutton1:PenSoftwareLink
• Functionbutton2:PageDown
• Functionbutton3:PageUP
You can change the functions that are assigned to the function
buttons.Fordetails,seetheTouchPenUtilityOperation
Manual.
Using as a digitizer pen
A touch pen can be used as a Windows digitizer pen.
Touseatouchpenasadigitizerpen,changethe“Input
mode”to“PenDigitizer”intheTouchPenUtility.Fordetails,
seetheTouchPenUtilityOperationManual.
The function buttons are used differently when the pen is a
digitizerpen.Touseafunction,touchthescreenwhileholding
down the button of that function.
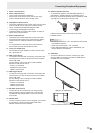
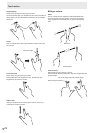
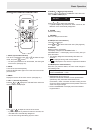
TIPS
• Holdthetouchpenatthepartindicatedbelow.Incorrect
operationmayresultifyourngeristooclosetothetipof
the pen.
CAPACITIVE
• Whenthefunctionbuttonispressed,thebatteryindicator
illuminates.
Ifthebatteryindicatordoesnotilluminate,checkifthe
battery is depleted.
• Usefunctionbuttonsnearthefrontofthescreen.Iftoofar
away,operationwillnotbepossible.
• Pressfunctionbuttonsslowlyandrmly.Ifpressedtoo
quickly,theactionmaynotberecognized.
• Thelinemaybreakifthetouchpenbatteryisloworthere
is other wireless equipment in operation nearby.
• Ifthepentipbecomesdamagedandthetouchpaneldoes
notrespond,replacethepentip.
*Wheninsertingthepentip,insertrmlyallthewayin.
•
The pen tip is made soft to protect the screen and improve
writability.Forthisreason,thepentipmaybecomedeformed,
however,thisisnotafailure.
• Thetouchpenscannotbeusedastouchpensanddigitizer
pens at the same time. When the setting is changed in the
TouchPenUtility,alltouchpensbecomedigitizerpens.
Multiple digitizer pens cannot be used at the same time.
n
Touch pen settings
TouchpensettingsareconguredusingtheTouchPenUtility.
Fordetailsonthesettingsandhowtousetheutility,seethe
TouchPenUtilityOperationManual.
Adding touch pens (pairing)
• Upto4touchpenscanbeusedsimultaneously.(Upto10
touch pens can be registered.)
• Touseanoptionaltouchpenwiththemonitor,thetouch
pen must be registered in the touch pen adapter. (pairing)
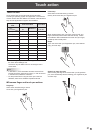
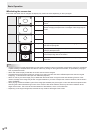
Item Model Remarks
Touch pen PN-ZL03 Forcapacitivetouchpanel
Perform touch pen pairing for one pen at a time.
1. Click the Touch Pen Utility icon (
) on the taskbar.
2. Click [Touch pen settings].
3. Select a line in the touch pen settings screen that does
not have a pen registered, and touch [Registration].
4. Simultaneously hold down function button 1 and
function button 3 of the touch pen being paired for at
least 5 seconds.
5. When the battery indicator blinks twice or more,
release function button 1 and function button 3.
A message appears after completion of pairing.
6. Touch [OK].
TIPS
• Whenmultipletouchpensareused,touchpositionsand
touchpeninformation(color,thickness,etc.)maybecome
interchanged,andlinesmaybreak.
- When touched simultaneously
- When touch pens are moved near each other
- When batteries are low
- When other wireless equipment is operating nearby
• Donotpressthepentiponotherthanthescreen.
This may cause malfunctioning.
• Onetouchpencannotberegisteredinmultipletouchpen
adapters.
Touch Panel / Touch Pen Preparations


Find Your Products By Category
Please Login
