
0
Owner's of the Kramer Electronics Vacuum Cleaner Kramer Electronics Vacuum Cleaner gave it a score of 0 out of 5. Here's how the scores stacked up:


WP-121 – Contents i
Contents
1 Introduction 1
2 Getting Started 2
2.1 Achieving the Best Performance 2
3 Overview 3
3.1 About the Power Connect™ Feature 3
3.2 Shielded Twisted Pair (STP)/Unshielded Twisted Pair (UTP) 4
3.3 Defining EDID 4
4 Defining the WP-121 5
5 Installing and Connecting the WP-121 7
5.1 Installing the WP-121 7
5.2 Connecting the WP-121 7
5.3 Grounding the Wall Plate 8
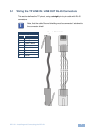
5.1 Wiring the TP LINE IN / LINE OUT RJ-45 Connectors 9
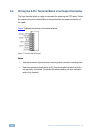
5.2 Wiring the 9-Pin Terminal Block Line Output Connector 10
6 Capturing the EDID 11
7 Capturing the EDID from a Display Device 12
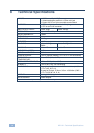
8 Technical Specifications 14
Figures
Figure 1: WP-121 US Version (69mm) 5
Figure 2: WP-121 Front Panel (80/86mm) 6
Figure 3: WP-121 Rear Panel (80/86mm) 6
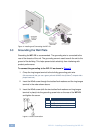
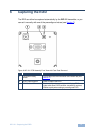
Figure 4: Installing and Connecting the WP-121 8
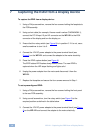
Figure 5: Ground Connection 8
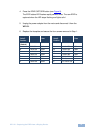
Figure 6: TP PINOUT 9
Figure 7: Terminal Block Pinouts 10
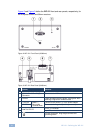
Figure 8: WP-121 PCB Assembly Front View with Face Plate Removed 11


Find Your Products By Category
Please Login
