
0
Owner's of the Kramer Electronics Vacuum Cleaner Kramer Electronics Vacuum Cleaner gave it a score of 0 out of 5. Here's how the scores stacked up:


12 WP-121 - Capturing the EDID from a Display Device
7 Capturing the EDID from a Display Device
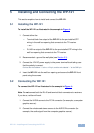
To capture the EDID from a display device:
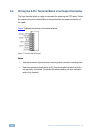
1. Using a Philips screwdriver, remove the four screws holding the faceplate to
the PCB assembly.
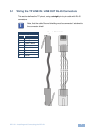
2. Using a short cable (for example, Kramer model number C-MGM/MGM-1),
connect the PC IN input 15-pin HD connector on the WP-121 to the XGA
connector of the display and turn the display on.
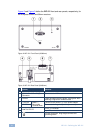
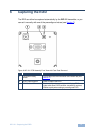
3. Ensure that the rotary switch (see
Figure 8) is in position 0. If it is not, use a
small screwdriver to turn it to 0.
4. Connect the 12V DC power adapter to the power terminal block (see
Figure 4) on the WP-121 and connect the adapter to the mains electricity.
5. Press the EDID capture button (see
Figure 8).
The EDID status LED flashes slowly several times. The new EDID is
captured when the LED stops flashing and lights solid.
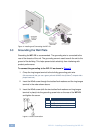
6. Unplug the power adapter from the mains and disconnect it from the
WP-121.
7. Replace the faceplate and secure the four screws removed in Step 1.
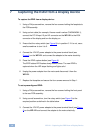
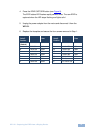
To set a preconfigured EDID:
1. Using a Philips screwdriver, remove the four screws holding the front panel
to the rear PCB assembly.
2. Using a small screwdriver, turn the rotary switch (see
Figure 8) to the
required position as defined in the table below.
3. Connect the 12V DC power adapter to the power terminal block (see
Figure
4) on the WP-121 and connect the adapter to the mains electricity.


Find Your Products By Category
Please Login
