

0
Owner's of the Kramer Electronics DJ Equipment Kramer Electronics DJ Equipment gave it a score of 0 out of 5. Here's how the scores stacked up:

Connecting the VP-108 1:8 XGA / Balanced Stereo Audio DA
7
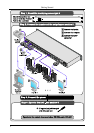
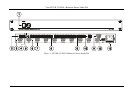
6 Connecting the VP-108 1:8 XGA / Balanced Stereo Audio DA
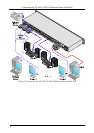
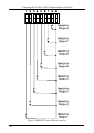
To connect the VP-108 1:8 XGA / Balanced Stereo Audio DA, as the example
in Figure 3 illustrates, do the following
1
:
1. Connect the XGA graphics source (for example, a PC) to the XGA
INPUT 15-pin HD connector, and connect
2
the balanced stereo audio
source to the AUDIO INPUT terminal block connector.
2. Connect up to 8 XGA OUTPUT 15-pin HD connectors to the XGA
acceptors (for example, XGA monitors), and connect
2
the corresponding
AUDIO OUTPUT terminal block connectors to the stereo audio acceptors
(for example, pairs of stereo loudspeakers).
3. Connect the LOOP 15-pin HD connector (OPTIONAL) to the XGA
INPUT 15-pin HD connector on an additional unit to increase video
outputs.
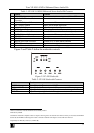
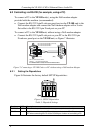
4. Set the dipswitches (see section 6.2.1).
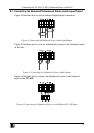
5. Set the switches on the underside for looping
3
(see Figure 2).
6. Connect the power cord
4
.
7. Adjust the left and right audio signal levels, if required.
8. If required
5
, connect a PC and/or controller to the RS-232 port (see
section 6.2), and/or the RS-485 port.
9. If required, connect a remote contact closure switch (see section 6.3).
1 Switch OFF the power on each device before connecting it to your VP-108. After connecting your VP-108, switch on its
power and then switch on the power on each device. Switching on the VP-108, recalls the last status prior to powering down
2 See section 6.1 for a description of how to connect a balanced/unbalanced stereo audio input/output
3 The default settings are for non-looping
4 The power connector is not illustrated in Figure 3
5 Not illustrated in Figure 3


Find Your Products By Category
Please Login
