

0
Owner's of the Kramer Electronics Air Conditioner Kramer Electronics Air Conditioner gave it a score of 0 out of 5. Here's how the scores stacked up:


Using the WP-211DS
5
5 Using the WP-211DS
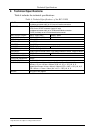
For details of how to:
Install your WP-211DS, see section 5.1
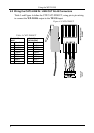
Wire the CAT5 LINE IN / LINE OUT RJ-45 connectors, see section 5.2
Connect your WP-211DS, see section 5.3
Select the default master source signal, see section 5.4
Connect the REMOTE connector, see section 5.5
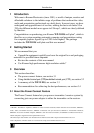
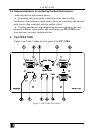
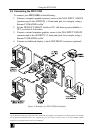
You can use your WP-211DS, for example, in a conference room, as the
example in Figure 3 illustrates:
Figure 3: Example of a Conference Room WP-211DS Installation
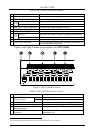
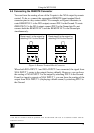
5.1 Installing the WP-211DS
To install your WP-211DS, connect each of the following terminal block output
connectors to the pre-installed wiring in the wall box opening
1
, the:
1. XGA OUT RGBHV 10 PIN. It connects to the XGA acceptor (for example, a
projector).
2. AUDIO OUT 3 PIN. It connects to the audio acceptor (for example, a pair of
speakers).
3. CAT5 OUTPUT 8 PIN. It connects to the CAT5 line input.
4. REM 3 PIN. It connects to the remote connector (see section 5.5).
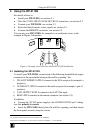
In addition:
Connect the 12V DC power supply to the POWER SUPPLY pins
2
, taking
care that polarity is correct
Insert the WP-211DS directly into the wall box opening, and then mount
the front panel securely using the screws
1 As required. Some features may not be required in an installation
2 Connect the wire labeled “+” to the +12V pin, and the wire labeled “–” to the GND pin


Find Your Products By Category
Please Login
