
0
Owner's of the Crown Car Amplifier XTI2 SERIES gave it a score of 0 out of 5. Here's how the scores stacked up:
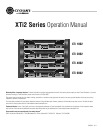
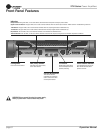
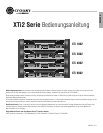

XTi2 Series Power Amplifiers
Operation Manual
page 4
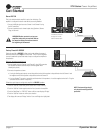
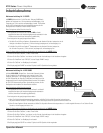
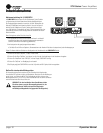
Stereo DSP Off
This is the default mode the amplifier is set to from the factory. The
amplifier is configured for stereo mode with all processing disabled.
1. Connect Left/Right signal source to Channel 1 and Channel 2 using
the XLR connectors.
2. Connect a speaker to each channel output using Speakon
®
, Banana
Plugs, or bare wire.
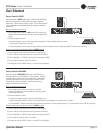
Factory Preset #2: BRIDGE
Putting the amplifier in BRIDGE (bridge-mono) mode delivers the power of
both amp channels into a single 8 or 4 ohm load. The XTi2 Series amplifiers
come pre-loaded with a preset that makes it easy to configure the amplifier for
this operation.
Before you get started ensure that you:
1.
Connect signal source to Channel 1 and Channel 2 using XLR connectors
(the amplifier inputs will automatically be summed together when
selecting this preset).
2.
Connector the speaker as shown.
a.
If using the binding post outputs, connect the positive terminal of the speaker to the positive terminal of Channel 1 and
the negative terminal of the speaker to the positive terminal of Channel 2.
b.
If using a Speakon
®
connector, connect the positive terminal of the speaker to 1+ and the negative terminal to 2+. Plug the
connector into the Channel 1 output only.
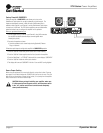
Follow these quick steps to configure the amplifier for BRIDGE operation:
1.
Push the “Set/Enter” button and you will see the word “Preset” flashing.
2.
Push the “Set/Enter” button again to enter the list of presets in the amplifier.
3.
Push the “Next/Down” or “PREV/UP” button until the screen displays “Bridge”.
4.
Push the “Set/Enter” button to confirm your selection.
5.
The display will now read “Bridge” with the Y icon and Bridge icon highlighted.
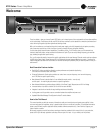
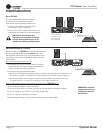
Get Started
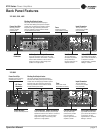
XTi 6002 back panel shown.
See page 9 for XTi 1002,
2002 and 4002 back panel.
NOTE: Custom wiring should
only be performed by qualified
personnel.
WARNING: Before you start to set up your
amplifier, make sure you read and observe
the Important Safety Instruc tions found at
the beginning of this manual.


Find Your Products By Category
Please Login
