
0
Owner's of the Azden Mixer FMX-42 gave it a score of 0 out of 5. Here's how the scores stacked up:

INTRODUCTION:
Thank you for purchasing Azden’s FMX-42 4-channel field mixer. The FMX-42 has
many unique features, making it very important to read and understand this manual
completely before use. Designed to work with most microphones that have a low-
impedance XLR output or line-level devices, the FMX-42’s output can be connected
to virtually any video camera or audio recorder, which has XLR or mini-connector
mic/line inputs.
POWERING THE FMX-42
Battery Power:
Make sure the mixer is turned “OFF” (2). Remove the battery cover (1) by
pressing the clip in and then lifting up and removing the cover from the unit. Install 6
fresh “AA” ALKALINE batteries following the polarity diagram inside the battery
compartment. Do not force the batteries. When all 6 batteries are installed, replace
the battery cover and move the power switch (2) to the “BATT” position. The
“POWER” LED (4) will turn GREEN. When the battery voltage level becomes too
low for proper operation the “POWER” LED will turn RED. When this happens
replace the batteries with fresh, new “AA” ALKALINE batteries.When not in use,
turn the mixer “POWER” switch (2) to “OFF” to conserve battery life.
External Power:
The FMX-42 can be powered from an external power supply. After attaching the
power supply to an active 110VAC source and to the “EXT DC IN” jack (3) on the
FMX-42, move the power switch (2) to the “EXT” position. The “POWER” LED (4)
will turn green. When not in use, turn the mixer “POWER” switch to “OFF” and
disconnect the power supply from the mixer.
Wearing the FMX-42:
The FMX-42 is supplied with a ballistic nylon case. Place the mixer in the case and
adjust the neck strap to achieve the most comfortable position for you. A back
harness (not supplied) can be secured to the metal rings on the case for additional
support and comfort.
INPUTS and SETTINGS
“INPUT” Channels: “CH 1”, “CH 2”, “CH 3” and “CH 4”
Connect the output of a microphone, wireless receiver or line-level audio compo-
nent to “INPUT CH 1” (5) and/or “CH 2” (5) and/or “CH 3” (5) and/or “CH 4” (5).
The inputs accept a standard 3-pin male XLR connector equipped cable. Push the
connector into the input jack until it locks. To remove the connector, press the
“PUSH” tab (6) and pull the connector out.
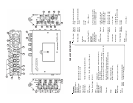
Illustration numbers:
Shown in the instructions within ( ), these numbers refer to the illustrations on the inside cover.
Note: The FMX-42 is not supplied with an external power supply. An optional power supply,
part number BC-26U, is available from Azden’s web site: www.azdencorp.com.
14
OUTPUTS and SETTINGS
Monitor “LEVEL” and “MONITOR” Output Jack:
The “MONITOR” “LEVEL” (22) adjusts the volume of headphones connected to the
“MONITOR” output jack (23). Zero is the lowest (quietest) setting, 10 is the highest
(loudest).
Monitor “SELECT”:
Normally, the monitor “SELECT” switch (24) is set to position “L/R”. In this position
you will monitor the sound of all connected microphones using stereo headphones.
If you only want to hear the “L” output, use stereo headphones and set the switch to
position “L”. Or, if you only want to hear the “R” output, use stereo headphones and
set the switch to position “R”. The use of mono headphones is not recommended.
“OUTPUT” “L” and “R”:
Connect a cable from “OUTPUT” “L” (14) and/or “OUTPUT” “R” (15) to the micro-
phone or line input of your video camera or audio recorder. These outputs accept
a standard 3-pin female XLR connector equipped cable. Push the cable connector
into the output jack until it locks. To remove the connector press the release tab on
the connector and pull the connector out.
“OUTPUT” “LEVEL” Settings:
Select the “OUTPUT” “LEVEL” (26) that is best-suited for your video camera or
audio recorder. The “+4 dBu” setting is for line-level audio inputs and the “-36 dBu”
setting is for a microphone-level audio input.
“STEREO” Mini-Connector Output:
The “STEREO” mini-connector (3.5 mm) output (25) is designed for video cameras
or audio recorders which have mini-connector microphone-level inputs.This output
is stereo (dual-channel) and unbalanced. It is recommended to use a stereo-to-
stereo mini-cable (not supplied) from the “STEREO” mini-connector output to the
microphone or line-level input of your video camera or audio recorder. Because
the FMX-42 has low-impedance XLR inputs and a mini-connector output, users of
mini DV cameras that have mini-connector microphone inputs can now use high-
quality microphones with XLR outputs.
“EXTERNAL DC IN”:
For external powering of the mixer, connect a power supply to this input (3).
Maximum rating of the power supply should not exceed 12 volts DC, 350mA.
Azden recommends using its BC-26U.
“METER ILLUM”:
Turn this switch (27) “ON” to light up the VU Meters and set your audio levels.
Turn this switch “OFF” when not using the meters to conserve battery power.


Find Your Products By Category
Please Login
