
0
Owner's of the Behringer Stereo Amplifier Behringer Stereo Amplifier gave it a score of 0 out of 5. Here's how the scores stacked up:


ENGLISH
XENYX 502/802/1002/1202 User Manual
8
ENGLISH
XENYX 502/802/1002/1202 User Manual
9
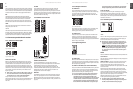
Installation3.
Mains connection3.1
AC POWER IN
Connect the power supply to the 3-pin mains connector
on the rear of the console. Use the AC adapter supplied to
connect the console to the mains. The adapter complies with
all applicable safety standards.
Please use only the power supply unit provided with ◊
the console.
Never connect the XENYX to the power supply unit ◊
while the latter is connected to the mains! First connect
the console to the power supply unit, then connect the
power supply unit to the mains.
Please note that both the power supply unit and the ◊
mixing console heat up considerably during operation.
This is completely normal.
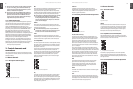
Audio connections3.2
You will need a large number of cables for different
applications. The illustrations below show how the connectors
should be wired. Be sure to use only high-grade cables.
Please use commercial RCA cables to connect the 2-track
inputs and outputs.
You can, of course, also connect unbalanced devices to the
balanced inputs/outputs. To do this, use either mono plugs
or stereo plugs with the ring and sleeve bridged (pins 1 and
3 in the case of XLR connectors).
Caution! Never use unbalanced XLR connectors (PIN 1 ◊
and 3 connected) on the MIC input connectors when
using the phantom power supply.
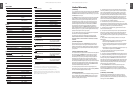
XLR connectionsFig. 3.1:
Strain relief clamp
Sleeve
Tip
Sleeve
(ground/shield)
Unbalanced ¼" TS connector
Tip
(signal)
¼" mono plugFig. 3.2:
¼" stereo plugFig. 3.3:
input
output
For unbalanced use, pin 1 and pin 3 have to be bridged
1 = ground/shield
2 = hot (+ve)
3 = cold (-ve)
12
3
1
2
3
Balanced use with XLR connectors
strain relief clamp
sleeve
ring
tip
sleeve
ground/shield
For connection of balanced and unbalanced plugs,
ring and sleeve have to be bridged at the stereo plug.
Balanced 1/4" TRS connector
ring
cold (-ve)
tip
hot (+ve)
strain relief clamp
sleeve
ring
tip
sleeve
ground/shield
1/4" TRS headphones connector
ring
right signal
tip
left signal
Stereo plug for headphones connectionFig. 3.4:
Specifications4.
Mono inputs
Microphone inputs (XENYX Mic preamp)
Type XLR connector, electronically
balanced, discrete input circuit
Mic E.I.N.
1
(20 Hz - 20 kHz)
@ 0 Ω source resistance -134 dB / 135.7 dB A-weighted
@ 50 Ω source resistance -131 dB / 133.3 dB A-weighted
@ 150 Ω source resistance -129 dB / 130.5 dB A-weighted
Frequency response
<10 Hz - 150 kHz -1 dB
<10 Hz - 200 kHz -3 dB
Gain range +10 dB to +60 dB
Max. input level +12 dBu @ +10 dB GAIN
Impedance approx. 2.6 kΩ balanced
Signal-to-noise ratio 110 dB / 112 dB A-weighted
(0 dBu In @ +22 dB GAIN)
Distortion (THD+N) 0.005 % / 0.004 % A-weighted
Line input
Type ¼" TRS jack, electronically
balanced
Impedance approx. 20 kΩ balanced, approx.
10 kΩ unbalanced
Gain range -10 dB to +40 dB
Max. input level +22 dBu @ 0 dB GAIN
Fade-out attenuation
2
(Crosstalk attenuation)
Main fader closed 90 dB
Channel muted 89.5 dB
Channel fader muted 89 dB
Frequency response (Mic In → Main Out)
<10 Hz - 90 kHz +0 dB / -1 dB
<10 Hz - 160 kHz +0 dB / -3 dB
Stereo inputs
Type ¼" TRS jack, electronically
balanced
Impedance approx. 20 kΩ
Max. input level +22 dBu
EqualizEr
EQ mono channels
LOW 80 Hz / ±15 dB
MID 2.5 kHz / ±15 dB
HIGH 12 kHz / ±15 dB
EQ stereo channels
LOW 80 Hz / ±15 dB
MID 2.5 kHz / ±15 dB
HIGH 12 kHz / ±15 dB


Find Your Products By Category
Please Login
