
0
Owner's of the Panasonic Camcorder Memory Card Camera-Recorder gave it a score of 0 out of 5. Here's how the scores stacked up:


– 89 –
Chapter 4 Adjustments and Settings for Recording — Handling setting data
2
Select the file to write from the list.
The title entry screen and keyboard are displayed.
3
Enter the desired characters with the keyboard.
4
Use the jog dial button (or cursor buttons `/{/Y/I) to select [OK], and press the jog dial button (or <SET> button).
The conrmation screen is displayed.
5
Select [YES], and press the jog dial button (or <SET> button).
The le is saved and the le list is updated.
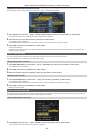
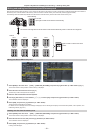
Reading setting data for scene les
1
Select [LOAD] in the main menu → [FILE] → [SCENE], and press the jog dial button (or <SET> button).
The list of scene les currently saved in camera memory is displayed.
2
Select the file name to load, and press the jog dial button (or <SET> button).
The conrmation screen is displayed.
3
Select [YES], and press the jog dial button (or <SET> button).
Loading of the le begins.
4
When the completion message is displayed, press the jog dial button (or <SET> button).
Initializing (clearing) setting data for scene les
1
Select [CLEAR] in the main menu → [FILE] → [SCENE], and press the jog dial button (or <SET> button).
The list of scene les currently saved in camera memory is displayed.
2
Select the file name to delete, and press the jog dial button (or <SET> button).
The conrmation screen is displayed.
3
Select [YES], and press the jog dial button (or <SET> button).
Deletion (clearing) of the le begins.
How to restore menu setting status to factory setting values
The menu setting status on the camera can be returned to factory setting status.
1
Select [LOAD FACTORY DATA] in the main menu → [FILE] → [INITIALIZE], and press the jog dial button (or <SET> button).
The conrmation screen is displayed.
If [SYSTEM RESTART] is displayed on the conrmation screen, the camera will restart after reading out is complete.
2
Select [YES], and press the jog dial button (or <SET> button).
Reading out of data for the factory setting begins.
@@
NOTE
t Data scene les and lens les and data saved as user data is not deleted by performing this operation.
Lens le
Eight lens les are stored to internal memory on the camera.
Eight titles (total 64) of lens les can be written to SD memory cards with eight lens les saved as a single title.
The following data is recorded to lens les:
fTitle name
fWhite shading compensation values
fFlare compensation values
fRB gain offset compensation values
How to create lens les
Adjusting the white shading
For details on adjusting white shading, refer to “White shading compensation” (page 98).
Adjusting are
Adjust are by [LENS R FLARE], [LENS G FLARE] and [LENS B FLARE] in the main menu → [MAINTENANCE] → [LENS FILE ADJ].
Adjusting RB gain offset
Compensate for changes in white balance that occur when the lens is replaced.
1
Mount the lens to be used as a reference on the camera.
2
Shoot a grayscale chart under appropriate lighting (2000 lx or 3200 K preferred).
3
Set the <WHITE BAL> switch to <A>.


Find Your Products By Category
Please Login
