
0
Owner's of the Panasonic Camcorder Memory Card Camera-Recorder gave it a score of 0 out of 5. Here's how the scores stacked up:


– 39 –
Chapter 3 Recording and Playback — Special recording functions
fRecording is started.
fTo stop recording, press the <REC> button.
fTo clear settings, either turn off the power or set [NORMAL] in the main menu → [REC/PB] → [REC FUNCTION] → [RECORDING].
f[LOOP] is displayed in the P2 remaining card capacity at the bottom of the display window and top of the viewnder. The [LOOP] indicator ashes
when loop recording is not possible due to insufcient memory.
@@
NOTE
t When this function is used, each P2 card must have at least one minute of free space.
t The standard recording time in accordance with the recording format is displayed as the P2 card remaining capacity displayed in the mode check
screen of the display window or viewnder. When loop recording is stopped immediately after an old recording is erased, the time recorded on the
card is sometimes less than the indicated time.
t When set [SDI] in the main menu → [SYSTEM] → [SYSTEM MODE] → [REC SIGNAL], loop recording will not function.
t Pre-recording is disabled.
t It may take time for recording to stop. The subsequent operation is not accepted until the P2 card access LED stops ashing and stays illuminated.
t During loop recording, all P2 card access LEDs on the P2 cards used for recording are illuminated or ash orange. Note that loop recording stops
when these P2 cards are removed.
t Loop recording may stop when the input reference signal of the generator lock is disrupted during loop recording.
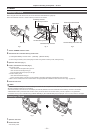
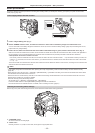
Hot swap recording
When P2 cards are inserted into two card slots, recording can be performed continuously across two cards.
Also, the card other than the one currently being recorded to can be swapped and recording can be continued on two or more cards. (hot swap
recording function)
Note, however, P2 card recognition might slow down depending on the timing (immediately after pre-recording or before and after continuous recording
across two card slots) that the P2 card is inserted into the vacant card slot. When inserting a P2 card, make sure that there is at least one minute of free
space on the card to be recorded to.
@@
NOTE
t Hot swap playback is not supported.
Recording check function
fAfter recording ends, pressing the <RET> button on the lens automatically plays back the last few seconds of the latest clip.
In this way, you can check whether video has been recorded properly. After playback, the camera is again ready to start recording.
fThe recording check function can be assigned to the <USER> buttons (<USER MAIN>/<USER1>/<USER2>). Set [USER MAIN], [USER1], [USER2],
[SHOT MARK (U3)], or [TEXT MEMO (U4)] to [RET SW] in the main menu → [CAMERA] → [USER SW].
fHolding down the <RET> button for one second plays back from the last ten seconds of the latest clip. During playback at recording check, pressing
the <RET> button again stops the playback.
@@
NOTE
t Set [REC CHECK] in main menu → [CAMERA] → [SW MODE] → [RET SW].
t When [SDI OUT1 MODE] or [MONITOR OUT MODE] is set to [MEM] in the main menu → [I/F SETUP] → [OUTPUT SEL], the playback image is
output not only to the viewnder but also the video output terminal (<SDI OUT1> terminal) and the monitor output terminal (<SDI OUT2>, <HDMI
OUT> and <VIDEO OUT>) during recording check. Note that when a backup device is connected and the backup image is being recorded, the
playback image currently in use by the recording check function will be recorded.
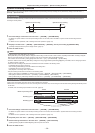
Shot mark recording function
Shot mark is the mark added to the thumbnail of each clip to distinguish that clip from others.
Only clips with shot marks attached can be displayed or played back.
Adding shot marks
1
Make sure that [SHOT MARK] is set to in the main menu → [CAMERA]→ [USER SW] → [SHOT MARK (U3)].
fIf it is set, the shot mark function is assigned to the <SHOT MARKER> button.
fThe shot mark function can be assigned to the <RET> button. To assign the function to the <RET> button, set [SHOT MARK] in the main menu →
[CAMERA] → [SW MODE] → [RET SW].
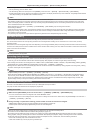
2
During recording or a pause after recording, press the button to which the shot mark is assigned.
f[MARK ON] is displayed, and the shot mark is added to the most recently recorded clip.
fAnother press of the button displays [MARK OFF] and the shot mark disappears.
@@
NOTE
t When the shot mark is added during a recording pause, it is added to the clip recorded immediately before.
t Shot marks can also be added while the thumbnail is being displayed. (page 113)
t Shot marks cannot be added during loop recording. If an operation is invalid, [SHOT MARK INVALID] is displayed when the button is pressed.
t During playback, setting or canceling the shot mark is not available. While pausing the playback, setting or canceling the shot mark is available.
t To add shot marks to combined clips, such as those recorded over multiple P2 cards, or delete them, there are following restrictions.
- All P2 cards constituting clips must be inserted into the slots.
- A shot mark is added only to the top clip among combined clips.


Find Your Products By Category
Please Login
