
0
Owner's of the Panasonic Camcorder Memory Card Camera-Recorder gave it a score of 0 out of 5. Here's how the scores stacked up:


– 36 –
Chapter 3 Recording and Playback — Basic procedures
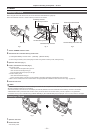
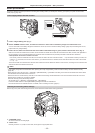
c: <OUTPUT>/<AUTO KNEE> switch
Set this switch to <CAM>/<ON>.
d: <TCG> switch
Set this switch to <F-RUN> or <R-RUN>.
e: <AUDIO SELECT CH1/3>, <AUDIO SELECT CH2/4> switches
Set these switches to <AUTO>.
@@
NOTE
t The [SLOT SEL] function is assigned to the <USER MAIN> button in the factory setting. You can switch to the P2 card to be recorded from two or
more inserted P2 cards.
When the P2 to record to is switched, the number of the card slot in which the P2 card to be recorded to is inserted is displayed on the P2 remaining
card capacity indicator in the viewnder. (For details on indications in the viewnder, refer to “Conguration of status display on viewnder screen”
(page 70).)
t The [SLOT SEL] is enabled also during recording. The [SLOT SEL] indicator ashes in the viewnder until switching of the P2 card to be recorded to is
completed. If the card could not be switched immediately after recording is started or immediately after the P2 card is switched, [SLOT SEL INVALID]
will be displayed.
t Switch the recording media between P2 memory cards (slots 1, 2) and microP2 memory cards (slots 3, 4) from the main menu → [REC/PB] → [REC/
PB SETUP] → [REC MEDIA]. [REC MEDIA] can also be assigned to the <USER> button.
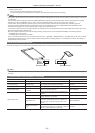
For shooting
White/black balance adjustment to completion of recording
For shooting, use the following steps.
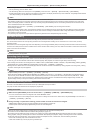
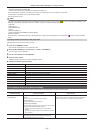
c db
a
e
a: <CC FILTER>/<ND FILTER> dial
b: <REC> button
c: <SHUTTER> switch
d: <AUTO W/B BAL> switch
e: <WHITE BAL> switch
1
Select the <CC FILTER>/<ND FILTER> dial setting according to the light conditions.
For details on setting example of the <CC FILTER>/<ND FILTER> dial, refer to “Shooting and recording/playback functions section” (page 20).
2
Operate the <WHITE BAL> switch.
r When white balance is already saved in memory
fSet the <WHITE BAL> switch to <A> or <B>.
r When neither white or black balance is saved in memory and you have no time to adjust the white balance:
fSet the <WHITE BAL> switch to <PRST>. The white balance matched to the lter is automatically adjusted according to the <CC FILTER>/<ND
FILTER> dial setting position.
r To adjust the white balance on the spot:
fSelect the lter matched to the lighting conditions. Set the <WHITE BAL> switch to <A> or <B>, shoot a white test subject, and follow the steps
below to adjust the white balance.
1) Press the <AUTO W/B BAL> switch towards the <AWB> side to adjust the white balance. (page 49)
2) Press the <AUTO W/B BAL> switch towards the <ABB> side to adjust the black balance. (page 51)
3) Press the <AUTO W/B BAL> switch towards the <AWB> side to adjust the white balance.
3
Point the camera at your subject and adjust the focus and zoom.
4
When using the electronic shutter, set the shutter speed and shutter mode. (page 53)


Find Your Products By Category
Please Login
