
0
Owner's of the Panasonic Camcorder Memory Card Camera-Recorder gave it a score of 0 out of 5. Here's how the scores stacked up:

– 24 –
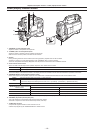
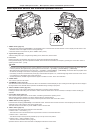
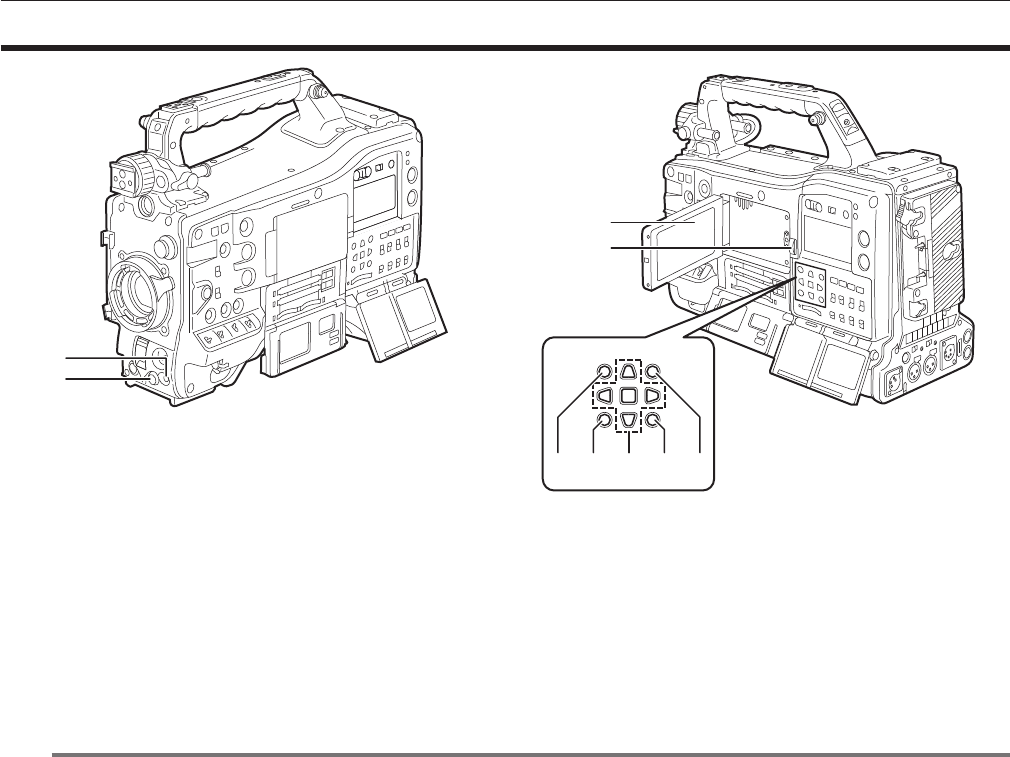
Chapter 2 Description of Parts — Menu operation section and thumbnail operation section
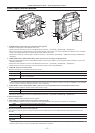
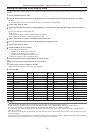
Menu operation section and thumbnail operation section
2
1
4
3
5 6 7 8 9
1 <MENU> button (page 134)
fPress this button to display [USER MENU] on the viewnder screen. Press this button for three seconds or more to display the main menu on the
viewnder screen. Press it again to return to the original image.
fThis button functions in the same way as the <MENU> button (cursor).
2 Jog dial button (page 134)
fWith the setting menu open, navigate through setting menus, select items, and set values.
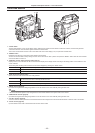
3 LCD monitor
Displays the video in the viewnder. Clips on the P2 card can also be displayed as thumbnails.
During thumbnail display, clips can be operated or deleted, and P2 cards can be formatted, for example, by operating the cursor/<SET> button or
operating the main menu → [CLIP].
@@
NOTE
t The quality of the image displayed in this monitor is different from the quality of the image that is actually recorded/output to the camera. Bear this
in mind, in particular, when [480-59.94i] or [576-50i] is set in the main menu → [SYSTEM] → [SYSTEM MODE] → [LINE&FREQ].
t When [480-59.94i] or [576-50i] is set in the main menu → [SYSTEM] → [SYSTEM MODE] → [LINE&FREQ], and camera video and playback video
are switched, the image on the monitor is temporarily disrupted. This is not a malfunction.
t If the battery is removed or the external DC power plug is removed while the power is on, a residual image might remain in the LCD screen. This is
not a malfunction. It will disappear if the screen is left as it is.
t At lower temperatures, residual images sometimes appear to increase on screen. This is not a malfunction.
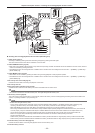
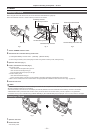
4 <OPEN> button
This is used to open the LCD monitor.
5 <THUMBNAIL> button (page 110)
This switches the video in the LCD monitor from video in the viewnder to thumbnail display of clips. Pressing this button again returns the display to
the original video in the viewnder. Button operations are disabled during recording and playback.
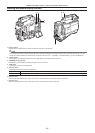
6 <EXIT>/<CANCEL> buttons (page 110)
Restore the display to the previous state while the setting menu or property screen is displayed.
Pressing this button while holding down the <SHIFT> button acts as the cancel button. This is convenient, for example, for batch-canceling clip
selections.
7 Cursor/<SET> button (page 110)
This is used for setting time codes or user bit values, and selecting thumbnails or operating menus.
When the setting menu is displayed, it is used for selecting items or changing settings.
The four triangular buttons are the cursor buttons, and the square button in the center is the <SET> button.
8 <MENU> buttons (cursor) (page 110)
Press this button to display [USER MENU] on the viewnder screen. Press this button for three seconds or more to display the main menu on the
viewnder screen. Press it again to return to the original image.
This button functions in the same way as the <MENU> button on the front side.
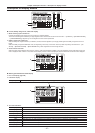
9 <SHIFT> button (page 110)
Press this button with other buttons held down at the same time.
f<SHIFT> button + cursor button (`/{)
This moves the cursor to the thumbnail of the clip at the start or the end on the thumbnail screen.
f<SHIFT> button + <SET> button
This selects all clips from the previously selected clip up to the clip at the cursor position.
f<SHIFT> button + <EXIT>/<CANCEL> button
This works as the cancelation function. (page 24)
Operations with the <SHIFT> button held down are displayed at the bottom of each button.


Find Your Products By Category
Please Login
