
0
Owner's of the Panasonic Camcorder Memory Card Camera-Recorder gave it a score of 0 out of 5. Here's how the scores stacked up:

– 21 –
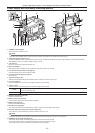
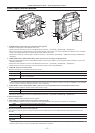
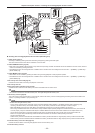
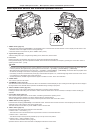
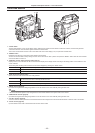
Chapter 2 Description of Parts — Shooting and recording/playback functions section
<ABB>
Adjusts black balance automatically.
When [ON] is set in main menu → [CAMERA] → [SW MODE] → [SHD,ABB SW CTL], the automatic adjustment function for black
shading can be assigned to this switch.
@@
NOTE
t When white balance or black balance is automatically adjusted, each of these automatic adjustments is canceled by pushing the <ABB> side or
<AWB> side again. The adjustment values at this time return to the values before automatic adjustment was performed.
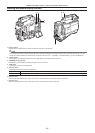
7 <MARKER SEL>/<MODE CHECK/MENU CANCEL> switch (page 80)
This is the spring switch to check selection of the marker and the shooting status of the camera.
<MKR>
Each time the switch is pressed towards the <MKR> side, the marker display switches in the viewnder between [A] marker display →
[B] marker display → hidden.
When the power is turned on, the status before the power was turned off is displayed.
<MCK/MCL>
Each time the switch is pressed towards the <MCK/MCL> side, the six screens that indicate the setting status of the camera ([STATUS]
screen, [!LED] screen, [FUNCTION] screen, [AUDIO] screen, [CAC] screen, [USER SW] screen) are switched in order in the viewnder.
This does not affect the output signals from the camera. The display goes out in about ve seconds. The display of the current selected
screen is continued by holding down the button.
If the button is pressed towards the <MCK/MCL> side while the setting menu is displayed, this button doubles as the switch for
canceling new setting values.
8 <GAIN> switch (page 49)
fSwitch the video amplier gain according to the lighting conditions under which you are shooting.
fThe gain values for the <L>/<M>/<H> positions can be set by each [[S] MASTER GAIN] of [LOW SETTING], [MID SETTING], or [HIGH SETTING]
in the main menu → [PAINT].
fFactory settings are L = 0 dB, M = 6 dB, and H = 12 dB.
9 <OUTPUT>/<AUTO KNEE> selector switch
Select the video signals output to the memory, viewnder and video monitor from the camera unit.
<CAM>/<ON>
Video captured on the camera is output and the auto knee function is activated.
Instead of the auto knee function, the dynamic range stretcher (DRS) function can be assigned.
<CAM>/<OFF>
Video captured with the camera is output and the auto knee function is not activated.
The knee point is xed to the level set by the main menu → [PAINT] → [KNEE/LEVEL] → [KNEE MASTER POINT].
<BARS>/<OFF>
The color bar signal is output. The auto knee function is not activated.
The color bar signal can be selected from the four types in the main menu → [CAMERA] → [SW MODE] → [COLOR BARS].
(page 149)
@@
NOTE
t As the factory setting, when the <OUTPUT>/<AUTO KNEE> selector switch is set to <BARS>, and <CH1> on the <AUDIO IN> switch is set to
<FRONT>, test signals are output to all four audio channels. The test signal output method can be changed in the main menu → [I/F SETUP] →
[MIC/AUDIO] → [TEST TONE].
t Auto knee function
When you adjust levels to shoot people or scenery against a strongly lit background, the background will be totally white-out, with buildings and
other objects blurred. In such a case, the auto knee function reproduces the background clearly.
The auto knee function is effective when shooting the following scenes:
- The subject is a person positioned in the shade under a clear sky.
- The subject is a person inside a car or a building, and you also want to capture the background visible through a window.
- The subject is a high-contrast scene.
10 <WHITE BAL> (white balance memory selector) switch (page 49)
Select the white balance adjustment method.
<PRST>
Set the switch to this position when you have no time to adjust the white balance.
f The factory setting is 3200 K.
f You can change to any color temperature in the main menu → [CAMERA] → [WHITE BALANCE MODE] → [COLOR TEMP PRE].
(page 150)
<A>/<B>
Adjust automatically the white balance by pressing the <AUTO W/B BAL> switch towards <AWB> and saves the adjusted value to
memory A or B.
You can also assign the auto tracking white balance (ATW) function to <B> in the main menu → [CAMERA] → [WHITE BALANCE
MODE] → [AWB B]. (page 50)


Find Your Products By Category
Please Login
