
5.0
Owner's of the JVC Camcorder GZR30BUS gave it a score of 5.0 out of 5. Here's how the scores stacked up:


Memo :
0
Using SD cards (including SDHC/SDXC cards) other than those specified
above may result in recording failure or data loss.
0
This unit is not guaranteed to operate with all SD cards. Some SD cards
may not work due to specification changes, etc.
0
Do not use a miniSD card or microSD card (even if the card is inserted in
an adapter). It may cause malfunction.
0
To record videos with “VIDEO QUALITY” set to “UXP”, use of a Class 6 or
higher compliant SDHC/SDXC card is recommended.
0
Class 4 and Class 6 are guaranteed to have a minimum transfer rate of 4
MB/s and 6 MB/s respectively during reading or writing of data.
0
You can also use a Class 10 compliant SDHC/SDXC card.
0
Both videos and still images can be recorded on one SD card. It is
recommended to confirm the video operation of the SD card before usage.
0
To protect the data, do not touch the terminals of the SD card.
0
UHS-I SDHC/SDXC cards can be used in the same manner as standard
SDHC/SDXC cards.
UHS Speed Class is not supported.
0
An SD card which is used for recording and/or editing on other devices
may not be played back or edited on this unit.
0
An SD card which is used for recording on this unit may not be used for
playing back and/or editing on other devices.
When your computer cannot recognize the SDXC card
Confirm and update the OS of your computer.
Windows
Vista
0
Make sure that the operating system version is SP1 or
higher.
0
Download and install the updating program (KB975823)
from the following URL.
32 bit version
http://www.microsoft.com/downloads/details.aspx?
displaylang=ja&FamilyID=2d1abe01-0942-4f8a-
abb2-2ad529de00a1
http://www.microsoft.com/downloads/en/details.aspx?
FamilyID=2d1abe01-0942-4f8a-abb2-2ad529de00a1
64 bit version
http://www.microsoft.com/downloads/details.aspx?
displaylang=ja&FamilyID=7d54c53f-017c-4ea5-
ae08-34c3452ba315
http://www.microsoft.com/downloads/en/details.aspx?
FamilyID=7d54c53f-017c-4ea5-ae08-34c3452ba315
Windows 7 Download and install the updating program (KB976422)
from the following URL.
32 bit version
http://www.microsoft.com/downloads/details.aspx?
displaylang=ja&FamilyID=3ee91fc2-a9bc-4ee1-
aca3-2a9aff5915ea
http://www.microsoft.com/downloads/en/details.aspx?
FamilyID=3ee91fc2-a9bc-4ee1-aca3-2a9aff5915ea
64 bit version
http://www.microsoft.com/downloads/details.aspx?
displaylang=ja&FamilyID=73f766dd-7127-4445-
b860-47084587155f
http://www.microsoft.com/downloads/en/details.aspx?
FamilyID=73f766dd-7127-4445-b860-47084587155f
Mac OS X
10.4 Tiger /
Mac OS X
10.5
Leopard
Not compatible.
Mac OS X
10.6 Snow
Leopard
Update the OS version to 10.6.5 or later.
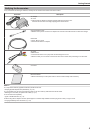
Using the Touch Screen
The LCD monitor of this unit is a touch panel which enables operations by
touching the screen.
Icon operation buttons, thumbnails, and menu items are displayed on the
touch screen according to the mode in use.
0
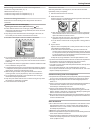
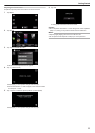
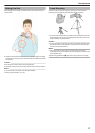
There are two ways to operate the touch screen, namely “tap” and “drag”.
The following are some examples.
A Tap the displayed button (icon) or thumbnail (file) on the touch screen
to make selection.
B Drag the thumbnails on the touch screen to search for the desired file.
.
Memo :
0
The touch screen of this unit is pressure-sensitive. When the touch screen
does not respond smoothly, apply slightly more force to your fingertip.
0
Tap the buttons (icons) on the touch screen accurately. The buttons may
not respond if they are not tapped on the right area.
0
Do not press or rub with excessive force.
0
Do not operate the touch screen using an object with a sharp tip.
0
Pressing two or more places at a time may cause a malfunction.
0
Perform “TOUCH SCREEN ADJUST” if the reactive area of the screen is
misaligned with the touched area. (Adjust by lightly tapping with a corner
of an SD card, etc. Do not press with an object with a sharp tip or do not
press hard.)
“Adjusting the Touch Panel” (A p. 11)
0
You cannot operate the touch screen under water. Lock the screen to
prevent operation errors.
“Shooting under Water” (A p. 32)
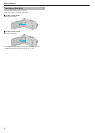
Locking the Screen (when Shooting Underwater)
Lock the screen before using this unit underwater to prevent operation errors
on the touch screen.
0
Once the screen is locked, operations on the touch screen are disabled.
0
The START/STOP (recording) button and the zoom lever can be used
while the screen is locked.
0
You can set for both video and still image modes.
o
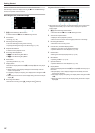
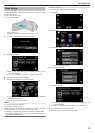
Setting the “SCREEN LOCK”
A
Check that the unit is in the recording mode.
B
Tap “MENU”.
C
Tap “RECORD SETTING”.
D
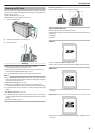
Tap “SCREEN LOCK”.
0
The L button appears on the screen.
.
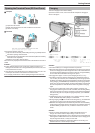
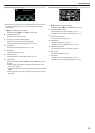
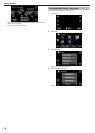
o
To cancel “SCREEN LOCK”
Tap the L button.
Memo :
0
Once “SCREEN LOCK” is set, only the L button on the touch screen can
be operated.
0
“SCREEN LOCK” cannot be set for the following cases:
- during recording
- when “TIME-LAPSE RECORDING”, “RECORDING EFFECT” or “DATE/
TIME RECORDING” has been set
Getting Started
10


Find Your Products By Category
Please Login
