
3.8
Owner's of the HP (Hewlett-Packard) Printer HP Officejet Pro 8100 N811A Inkjet Printer gave it a score of 3.8 out of 5. Here's how the scores stacked up:
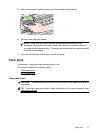


4. If you have not found the jam and have Tray 2 installed, pull out the tray and remove
the jammed media, if possible. If not, do the following:
a. Ensure the printer is turned off and disconnect the power cord.
b. Lift the printer off Tray 2.
c. Remove the jammed media from the bottom of the printer or from Tray 2.
d. Reposition the printer on top of Tray 2.
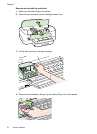
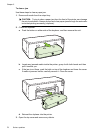
5. Open the print carriage access door. If there is paper remaining inside the printer,
ensure the carriage has moved to the right of the printer, free any paper scraps or
wrinkled media, and pull the media towards you through the top of the printer.
WARNING! Do not reach into the printer when it is on and the carriage is stuck.
When you open the print carriage access door, the carriage should return to its
position on the right side of the printer. If it does not move to the right, turn off the
printer before you remove any jam.
6. After clearing the jam, close all covers, turn on the printer (if you turned it off) and
resend the print job.
Avoid paper jams
To help avoid paper jams, follow these guidelines.
• Remove printed papers from the output tray frequently.
• Make sure that you are printing with media that is not wrinkled, folded, or damaged.
• Prevent curled or wrinkled paper by storing all unused paper flat in a resealable bag.
• Do not use paper that is too thick or too thin for the printer.
• Make sure that the trays are loaded correctly and are not too full. For more
information, see
Load media.
• Ensure that paper loaded in the input tray lays flat and the edges are not bent or torn.
• Do not combine different paper types and paper sizes in the input tray; the entire stack
of paper in the input tray must be the same size and type.
• Adjust the paper-width guide in the input tray to fit snugly against all paper. Make sure
the paper-width guide does not bend the paper in the input tray.
• Do not force paper too far forward in the input tray.
• Use paper types that are recommended for the printer. For more information, see
Select print media.
• If the printer is about to run out of paper, allow the printer to run out of paper first and
then add paper. Do not try to add paper while the printer is trying to pickup a sheet.
• If you are printing on both sides of a page, do not print highly saturated images on
light weight paper.
• Make sure that the printer is clean. For more information, see
Maintain the printer.
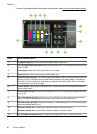
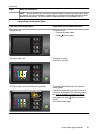
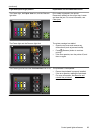
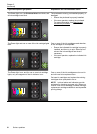
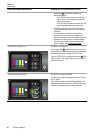
Control panel lights reference
The control panel lights indicate status and are useful for diagnosing printing problems.
This section contains information about the lights, what they indicate, and what action to
take if necessary.
Control panel lights reference 79


Find Your Products By Category
Please Login
