
3.8
Owner's of the HP (Hewlett-Packard) Printer HP Officejet Pro 8100 N811A Inkjet Printer gave it a score of 3.8 out of 5. Here's how the scores stacked up:
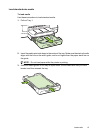

To configure the trays
1. Make sure the printer is turned on.
2. Perform one of the following:
Embedded web server
▲ Click the Settings tab and click Paper Handling in the left panel.
Print driver (Windows)
To configure default tray, complete the following steps:
a. Click Start, and then click Printers or Printers and Faxes or Devices and
Printers.
- Or -
Click Start, click Control Panel, and then double-click Printers.
b. Right-click the printer icon, and then click Properties or Printing Preferences.
c. Click the Paper/Quality tab.
d. In the Tray Selection group, select the desired tray from the Paper Source drop-
down list.
HP Printer Utility (Mac OS X)
▲ Click Paper Handling from the Printer Settings panel.
3. Click OK or Apply after changing the desired tray settings.
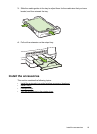
Turn on accessories in the printer driver
• To turn on accessories (Windows)
•
To turn on accessories (Mac OS X)
To turn on accessories (Windows)
1. Click Start, and then click Printers or Printers and Faxes or Devices and
Printers.
- Or -
Click Start, click Control Panel, and then double-click Printers.
2. Right-click the printer icon, and then click Properties.
3. Select the Device Settings tab. Click the accessory that you want to turn on, click
Installed from the drop-down menu, and then click OK.
To turn on accessories (Mac OS X)
Mac OS X automatically turns on all accessories in the printer driver when you install the
printer software. If you add a new accessory later, follow these steps:
1. Open the System Preferences and then select Print & Fax or Print & Scan.
2. Select the printer from list of printers, and then click Options & Supplies.
3. Click the Driver tab.
4. Select the options you want to install, and then click OK.
23


Find Your Products By Category
Please Login
