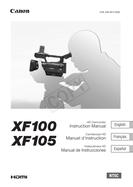

0
Owner's of the Canon Exercise Fitness Videos XF100 gave it a score of 0 out of 5. Here's how the scores stacked up:


143
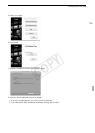
Photo Operations
5 Select [OK] and then press SET.
• The selected photo is protected and h appears next to the photo’s thumbnail.
• Select [Cancel] instead to cancel the operation.
• If a custom picture file is embedded in the photo, it is also protected.
IMPORTANT
• Initializing an SD card will permanently erase all the data it contains, including protected photos and custom
picture files.
Copying Custom Picture Files
You can copy to the camcorder a custom picture file embedded in a photo. Custom picture files can be copied
from the photo playback screen or [Photos] index screen.
Copying a File from the Playback Screen
1 Display the photo with the custom picture file to be copied.
•Refer to Viewing Photos (0 140).
2 Press SET to open the photo menu.
3 Select [Copy X File] and then press SET.
•The [X Data 1/3] screen appears with the orange selection frame indicating the first file slot in the
camcorder.
• You can push the joystick up/down to display the [X Data 2/3] and [X Data 3/3] screens.
4 Select the desired file slot in the camcorder and then press SET.
5 Select [OK] and then press SET.
• The custom picture file embedded in the selected photo is copied, overwriting the file in that slot.
6 When the confirmation message appears, press SET.
Copying a File from the Index Screen
1 Open the [Photos] Index Screen.
•Refer to Viewing Photos (0 140).
2 Move the orange selection frame to the photo with the custom picture file to be copied.
3 Press SET to open the photo menu.
4 Select [Copy X File] and then press SET.
•The [X Data 1/3] screen appears with the orange selection frame indicating the first file slot in the
camcorder.
• You can push the joystick up/down to display the [X Data 2/3] and [X Data 3/3] screens.
5 Select the desired file slot in the camcorder and then press SET.
6 Select [OK] and then press SET.
• The custom picture file embedded in the selected photo is copied, overwriting the file in that slot.
7 When the confirmation message appears, press SET.
NOTES
• You cannot copy a custom picture file to a slot that is protected.
Operating modes:
COPY


Find Your Products By Category
Please Login
