

0
Owner's of the Canon Camcorder XF205 gave it a score of 0 out of 5. Here's how the scores stacked up:


Custom Picture Settings
138
[
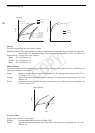
Knee Aperture
]: Allows you to set the sharpness of only the areas above the knee point by adjusting the gain and
slope. When [Gamma] is set to [Cine 1], [Cine 2] or [Wide DR], this setting has no effect on the
picture.
[Gain]: Sets the amount of sharpness. This setting can be adjusted from 0 to 9. (Default: 0)
[Slope]: Sets the slope of the sharpness. This setting can be adjusted from 0 to 3, with 0 having no slope, 1
having a steep slope and 3 having a gradual slope. (Default: 1)
[Level Depend]: Lowers the amount of sharpness applied to dark areas of the image.
[Level]: Sets the brightness of the dark areas of the image that will be affected. This setting can be adjusted
from 0 to 50. (Default: 0)
[Slope]: Determines the slope of the area between the upper and lower parts of the gamma curve. This
setting can be adjusted from 0 to 3, with 0 having no slope, 1 having a steep slope and 3 having a
gradual slope. (Default: 0)
[Offset]: Adjusts the sharpness level of dark areas in the image. Setting higher values will lower the sharpness
level. This setting can be adjusted from 0 to 50. (Default: 0)
[Ingredient Ratio]: Changing this ratio allows you to affect the balance between resolution and the reduction of
jagged edges. Higher values emphasize resolution while lower values emphasize the reduction
of jagged edges. This setting can be adjusted from -50 to 50. (Default: 0)
[Noise Reduction]
Reduces the amount of noise that appears in the image. Select [Automatic] to have the camcorder adjust the
noise automatically. Otherwise, select a level from 1 (lowest level) to 12 (highest level), or select [Off] to turn the
noise reduction off. (Default: [Off])
[Skin Detail]
The camcorder applies a softening filter to areas in the picture with skin tones to give a more pleasant
appearance. By changing these settings, you can determine what areas will be detected as skin tones. A zebra
pattern will appear over areas on the screen that are detected as having skin tones.
[Effect Level]: Adjusts the level of the filter. The available options are [Off], [Low], [Middle] and [High]. (Default:
[Off])
[Hue]: Adjusts the hue for detection of skin tones. This setting can be adjusted from -16 to 16.
(Default: ±0)
[Chroma]: Adjusts the color saturation for detection of skin tones. This setting can be adjusted from 0 to
31. (Default: 16)
[Area]: Adjusts the color range for detection of skin tones. This setting can be adjusted from 0 to 31.
(Default: 16)
[Y Level]: Adjusts the brightness for detection of skin tones. This setting can be adjusted from 0 to 31.
(Default: 16)
[Selective NR]
The camcorder detects the characteristics of a certain color or tone and applies a noise reduction filter to the
targeted areas. A zebra pattern will appear over targeted areas on the screen.
[Effect Level]: Adjusts the level of the noise reduction filter. The available options are [Off], [Low], [Middle] and
[High]. (Default: [Off])
[Hue]: Adjusts the hue for the color to be detected. This setting can be adjusted from 0 to 31.
(Default: 0)
[Chroma]: Adjusts the color saturation for the color to be detected. This setting can be adjusted from 0 to
31. (Default: 16)
[Area]: Adjusts the color range for the color to be detected. This setting can be adjusted from 0 to 31.
(Default: 16)
[Y Level]: Adjusts the brightness for the color to be detected. This setting can be adjusted from 0 to 31.
(Default: 16)
C OPY


Find Your Products By Category
Please Login
